Object Morph and Transformation Prompt
Turn one object into another with a controlled morph path instead of an unreadable melt.
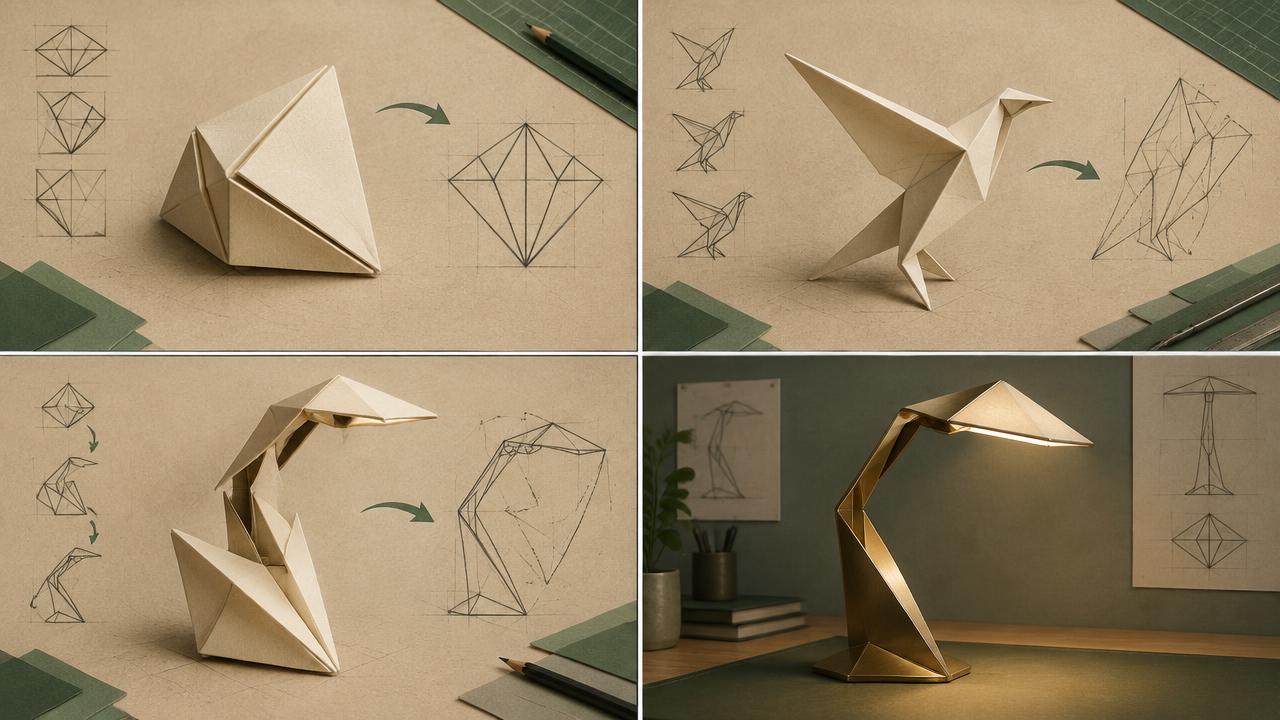
Structures an object transformation for AI video by defining the start and end forms, the morph mechanism, the shared silhouette anchor, the timing of the change and the material behaviour during the transition.
Ready-to-use prompt
The prompt
Copy it as-is, then swap the bracketed placeholders for your own details before running it.
Role: You are a VFX designer specifying an object transformation for an AI video model.

Context:
- Start object: {{object_a}}
- End object: {{object_b}}
- Mechanism: {{mechanism}} (liquid flow, particle scatter and reform, mechanical unfold, growth)
- Clip length: {{duration_seconds}} seconds

Task: Describe the morph with:
1. The shared silhouette anchor that persists through the change
2. Three named stages with timecodes: hold, transform, settle
3. The material behaviour at each stage (rigidity, viscosity, opacity)
4. Camera behaviour, ideally static or a slow single move
5. Lighting continuity across the change
6. The final frame state, clean and fully formed

Rules:
- Only one transformation per clip.
- The subject must remain identifiable at every frame.
- Do not let the object leave frame during the change.

Output: a stage-by-stage table plus a one-paragraph prompt for the model.
Estimated results
Editor's note
Why this prompt matters
Morphs go wrong when nothing persists. If every pixel is free to change, the model produces a two second smear and the viewer never reads either object. The trick borrowed from traditional VFX is an anchor: one silhouette feature, usually a base, an axis or an outline, that stays put while everything else transitions around it. This prompt builds the morph in three stages, hold, transform and settle, so the audience is given time to read the start state and the end state on either side of the change.
Why this matters: This technique depends on a persistent silhouette anchor, physical mechanism, and timed settle. A visually attractive take can still fail continuity or editability when those cues disagree. Establish one controlled reference, vary one element at a time, and compare every result against the same anchors before adding more motion or styling.
Anatomy
Prompt engineering breakdown
Role
Specialist video direction role priming
Context
Turn one object into another with a controlled morph path instead of an unreadable melt.
Goal
Transform one object into another in a readable way.
Constraints
Explicit numeric and directional constraints replace subjective adjectives.
Output format
stage table plus model prompt paragraph
Why this structure works
The silhouette anchor gives the model a spatial constraint that prevents unbounded deformation. Three timed stages create a readable arc instead of continuous flux. Material behaviour terms such as viscosity and rigidity map to physical simulation cues the model has seen, and requiring a clean final frame produces an asset you can hold on or cut from.
What you'll get
Expected output
Stage 1 0.0-1.0s Hold | ceramic coffee cup on oak table, static 50mm, soft window key Stage 2 1.0-3.0s Transform | cup surface liquefies and flows upward, viscosity like warm honey, silhouette keeps a rounded base throughout Stage 3 3.0-4.0s Settle | forms a glass vase, surface hardens, one specular highlight returns on the left edge
Prompt: static 50mm shot, ceramic cup melts upward into a glass vase over two seconds, rounded base silhouette retained, soft window key unchanged, final frame fully formed and still.
Under the hood
Why this prompt works
The silhouette anchor gives the model a spatial constraint that prevents unbounded deformation. Three timed stages create a readable arc instead of continuous flux. Material behaviour terms such as viscosity and rigidity map to physical simulation cues the model has seen, and requiring a clean final frame produces an asset you can hold on or cut from.
A practical review should separate subject accuracy, motion, camera, and environment rather than judging the clip as one impression. Without a stable feature, the transformation becomes an unreadable smear between unrelated objects. Choose compatible forms, keep camera and light fixed, and preserve one base, axis, or contour.
Review test: Scrub through the change and follow the chosen anchor; simplify the mechanism if it disappears, reverses, or leaves frame.
Production check: Test the transition without sound or editing first. The physical mechanism should remain understandable from silhouette and movement alone. If the change needs explanatory cuts, reduce the number of moving parts or extend the settle.
Choose start and end objects with compatible scale and framing. Large perspective changes during the morph create extra ambiguity and make the preserved anchor harder for both the model and viewer to follow.
Model fit
Best AI models for this prompt
Veo
Use natural-language cinematography to direct a persistent silhouette anchor, physical mechanism, and timed settle. Veo works best when physical cause, scene response, and camera intent form one coherent description; treat numeric settings as visual cues rather than guaranteed literal controls.
Kling
Use Subject Binding or the Element Library for recurring subjects, then direct a persistent silhouette anchor, physical mechanism, and timed settle. Place the bound identity before style and action. Kling can produce expressive motion, so reduce simultaneous changes when consistency weakens.
Runway
Use Gen-4 References to lock the approved subject or composition, then prompt primarily for a persistent silhouette anchor, physical mechanism, and timed settle. Generate difficult actions as separate short clips and assemble them in an editor when exact timing or continuity matters.
When to use
- For product reveals and brand transitions.
- For explainer content showing before and after states.
- For stylised social content.
When not to use
- When both objects must be shown accurately side by side.
- For technical documentation where accuracy beats spectacle.
- In clips shorter than two seconds.
Get more from it
Pro tips
- 1
Give a one second hold before the change so the start object registers.
- 2
Anchor the silhouette, usually the base or the outer contour.
- 3
Describe material physically, viscosity, rigidity and opacity beat adjectives.
- 4
End on a still, fully formed frame so the clip can hold or cut.
- 5
Review one controlled take for a persistent silhouette anchor, physical mechanism, and timed settle before increasing complexity.
Don't ship this
Common mistakes
✗ Morphing with a moving camera.
Fix — Lock the camera so the transformation supplies the motion.
✗ No hold or settle stage.
Fix — Reserve time at both ends for the start and end objects to read.
✗ Letting the object drift out of frame mid-morph.
Fix — State that the object stays centred throughout the change.
✗ Without a stable feature, the transformation becomes an unreadable smear between unrelated objects.
Fix — Choose compatible forms, keep camera and light fixed, and preserve one base, axis, or contour.
People also ask
Frequently asked questions
Q.Why does my morph turn into mush?
Nothing was anchored. Keep one silhouette feature constant and lock the camera.
Q.How long should the transform stage be?
About half the clip, with a hold before and a settle after so both objects read.
Q.Can I morph between very different objects?
Yes, if they share a silhouette family. A cup to a vase works, a cup to a bicycle rarely does.