Lighting Continuity Prompt for Character Shots
Hold key direction, colour temperature and contrast steady so your character reads as the same person.
Defines a reusable lighting anchor for AI video character work, fixing key direction and quality, fill ratio, colour temperature, practical sources and shadow behaviour so identity does not shift with the light.
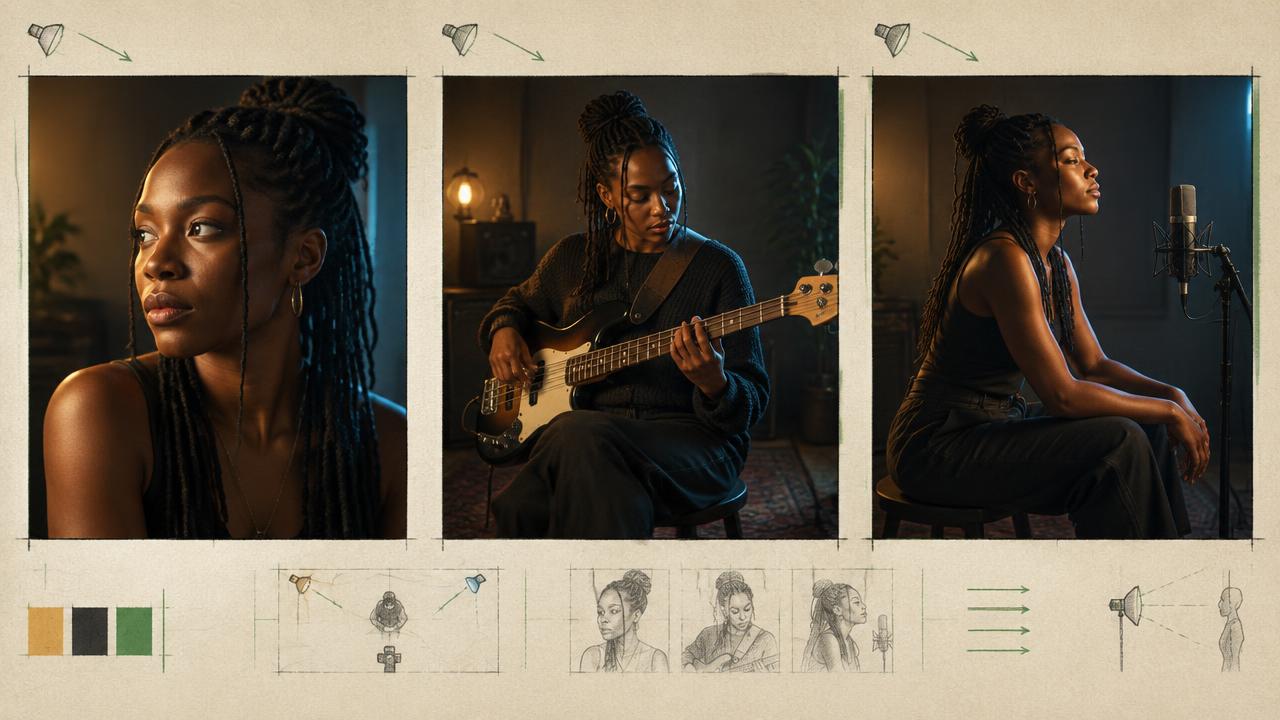
Ready-to-use prompt
The prompt
Copy it as-is, then swap the bracketed placeholders for your own details before running it.
Role: You are a director of photography maintaining lighting continuity across AI-generated character shots.

Context:
- Scene: {{scene}}
- Time of day: {{time_of_day}}
- Character lock: {{character_block}}
- Shot count: {{shot_count}}

Task: Write a lighting anchor to reuse in every shot. Specify:
1. Key light direction, height and quality (hard or soft)
2. Key to fill ratio in stops
3. Colour temperature in kelvin for key, fill and any practicals
4. Backlight or rim presence and side
5. Shadow direction and density on the face
6. Any allowed variation per shot, stated explicitly

Rules:
- Key direction may not change within a scene.
- Colour temperature stays fixed unless a practical motivates the change.
- Shadows fall the same way in every shot.

Output: a LIGHTING ANCHOR line plus a short per-shot variation table.
Estimated results
Editor's note
Why this prompt matters
A character can be described perfectly and still look like two different people across a cut, because the light changed. Key direction reshapes the face, contrast changes apparent age, and colour temperature changes skin tone. Lighting continuity is therefore part of character continuity, not a separate concern. This prompt produces a single lighting anchor line you reuse in every shot, expressed in the terms crews actually use, and forces any deviation to be planned in a variation table rather than emerging by accident.
Why this matters: This technique depends on key direction, height, contrast, colour temperature, and shadow geometry. A visually attractive take can still fail continuity or editability when those cues disagree. Establish one controlled reference, vary one element at a time, and compare every result against the same anchors before adding more motion or styling.
Anatomy
Prompt engineering breakdown
Role
Continuity and direction role priming
Context
Hold key direction, colour temperature and contrast steady so your character reads as the same person.
Goal
Hold lighting constant so character identity reads consistently.
Constraints
Locked, repeated wording and explicit continuity rules replace subjective description.
Output format
lighting anchor line plus variation table
Why this structure works
Key direction and height dominate perceived facial structure, so fixing them first stabilises identity. Fill ratios in stops are unambiguous where words like soft are not. Kelvin values stabilise skin tone, and requiring shadow direction to be stated gives you an immediate visual check for drift when reviewing takes.
What you'll get
Expected output
LIGHTING ANCHOR: soft key from camera left at 45 degrees and slightly above eye line, 5600K, key to fill 3:1, subtle warm rim from camera right, shadows fall to the right of the nose, medium density.
Variations: Shot 1: as anchor Shot 2: as anchor, plus 3200K practical lamp visible camera right Shot 3: as anchor, fill lifted to 2:1 for the emotional beat
Under the hood
Why this prompt works
Key direction and height dominate perceived facial structure, so fixing them first stabilises identity. Fill ratios in stops are unambiguous where words like soft are not. Kelvin values stabilise skin tone, and requiring shadow direction to be stated gives you an immediate visual check for drift when reviewing takes.
A practical review should separate subject accuracy, motion, camera, and environment rather than judging the clip as one impression. A lighting shift can make an unchanged face appear to be a different person. Repeat one lighting anchor verbatim and document only motivated exceptions in the variation table.
Review test: Compare the nose shadow, eye catchlights, skin tone, and rim-light side across adjacent shots before altering identity language.
Production check: Save one approved lighting reference beside the prompt. When a later shot drifts, restore the key direction and colour temperature first; rewriting facial traits to compensate usually creates a second continuity problem.
If the story requires a lighting change, bridge it visibly with a motivated source or transitional shot. An unexplained jump is read as a generation error even when each shot works alone.
Model fit
Best AI models for this prompt
Veo
Use natural-language cinematography to direct key direction, height, contrast, colour temperature, and shadow geometry. Veo works best when physical cause, scene response, and camera intent form one coherent description; treat numeric settings as visual cues rather than guaranteed literal controls.
Kling
Use Subject Binding or the Element Library for recurring subjects, then direct key direction, height, contrast, colour temperature, and shadow geometry. Place the bound identity before style and action. Kling can produce expressive motion, so reduce simultaneous changes when consistency weakens.
Runway
Use Gen-4 References to lock the approved subject or composition, then prompt primarily for key direction, height, contrast, colour temperature, and shadow geometry. Generate difficult actions as separate short clips and assemble them in an editor when exact timing or continuity matters.
When to use
- For any multi-shot character sequence.
- When cutting generated shots with real footage.
- When identity drifts even though the description is fixed.
When not to use
- For montages with intentional look changes.
- For abstract or non-character content.
- For single shots.
Get more from it
Pro tips
- 1
Write the anchor once and paste it into every shot prompt.
- 2
Express fill as a ratio in stops.
- 3
Check shadow direction in each take as a drift test.
- 4
Motivate any change with a visible practical in frame.
- 5
Review one controlled take for key direction, height, contrast, colour temperature, and shadow geometry before increasing complexity.
Don't ship this
Common mistakes
✗ Changing key direction between shots in a scene.
Fix — Fix the key position in the anchor and repeat it verbatim.
✗ Letting colour temperature drift.
Fix — State kelvin values for key, fill and practicals.
✗ Unplanned contrast changes.
Fix — Record any intended variation in the per-shot table.
✗ A lighting shift can make an unchanged face appear to be a different person.
Fix — Repeat one lighting anchor verbatim and document only motivated exceptions in the variation table.
People also ask
Frequently asked questions
Q.Can lighting really change who the character looks like?
Yes. Key direction and contrast reshape the face more than most description changes do.
Q.How do I change the mood without breaking continuity?
Adjust the fill ratio rather than the key direction, and record the change in the variation table.
Q.What if a scene moves indoors?
Write a second anchor for the new scene and keep it fixed for every shot inside it.