Character Turnaround and Angle Coverage Prompt
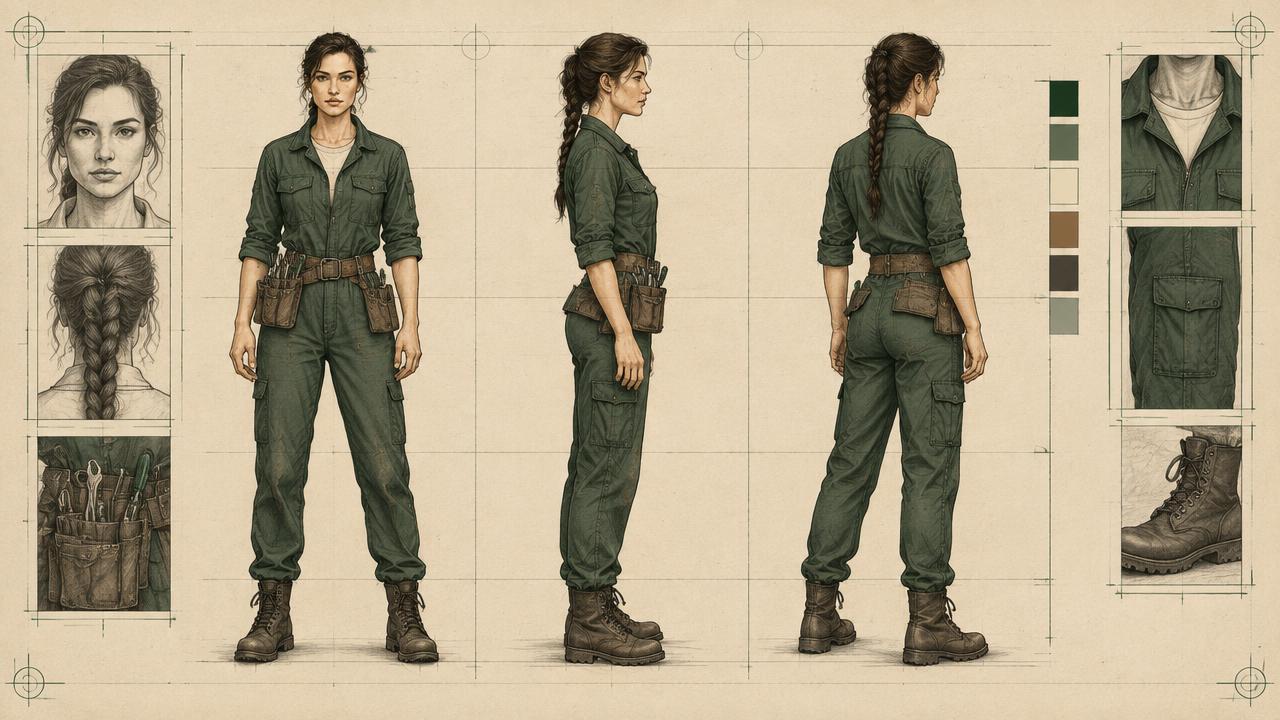
Generate front, profile and three-quarter views of the same character for reference and coverage.
Produces a character turnaround for AI video, specifying each angle, consistent lighting and framing, and the identity anchors that must read from every direction, giving you reference frames for later shots.
Ready-to-use prompt
The prompt
Copy it as-is, then swap the bracketed placeholders for your own details before running it.
Role: You are a character designer producing a turnaround reference set with AI video models.

Context:
- Character lock: {{character_block}}
- Purpose: {{purpose}} (reference sheet, coverage, image-to-video seed)
- Background: {{background}}

Task: Specify a turnaround covering:
1. Front view at eye level
2. Three-quarter left and three-quarter right
3. Full left and right profile
4. Rear view
5. Identical lighting, lens and distance for every angle
6. The identity anchors that must be visible in each angle, with a note where one is hidden

Rules:
- Neutral pose, arms relaxed, neutral expression.
- Same neutral background and floor position for all angles.
- Same focal length and camera height throughout.

Output: an angle-by-angle spec plus one generation prompt per angle.
Estimated results
Editor's note
Why this prompt matters
A turnaround is the cheapest insurance you can buy before generating a sequence. Once you have front, three-quarter, profile and rear views of the same person under identical lighting, you can see immediately whether your written character lock actually describes a coherent human, and you have seed frames for image-to-video shots later. The important discipline is holding everything except the angle constant, because if the lens or the light also changes you cannot tell whether the character drifted or the setup did.
Why this matters: This technique depends on identity anchors across front, three-quarter, profile, and rear views. A visually attractive take can still fail continuity or editability when those cues disagree. Establish one controlled reference, vary one element at a time, and compare every result against the same anchors before adding more motion or styling.
Anatomy
Prompt engineering breakdown
Role
Continuity and direction role priming
Context
Generate front, profile and three-quarter views of the same character for reference and coverage.
Goal
Create a reference turnaround of a consistent character.
Constraints
Locked, repeated wording and explicit continuity rules replace subjective description.
Output format
angle-by-angle spec plus per-angle prompts
Why this structure works
Holding lens, camera height, distance, lighting and background constant isolates the angle as the only variable, which makes drift immediately visible. Listing the identity anchors per angle tells you what to verify in each frame, including which anchor is hidden. A neutral pose and expression give reference frames that are usable as seeds rather than performance shots.
What you'll get
Expected output
Global: 50mm, camera at eye level, subject full body centred, mid-grey seamless background, soft frontal key 5600K with 2:1 fill, neutral expression, arms relaxed.
Front: both freckle cluster and left brow scar visible. Three-quarter left: scar visible, freckles partially visible. Profile left: scar visible on silhouette brow, freckles hidden, nose profile is the key anchor. Rear: hair length, parting and shoulder width are the anchors.
Under the hood
Why this prompt works
Holding lens, camera height, distance, lighting and background constant isolates the angle as the only variable, which makes drift immediately visible. Listing the identity anchors per angle tells you what to verify in each frame, including which anchor is hidden. A neutral pose and expression give reference frames that are usable as seeds rather than performance shots.
A practical review should separate subject accuracy, motion, camera, and environment rather than judging the clip as one impression. Changing lens, pose, or light with the angle makes drift impossible to diagnose. Generate one neutral angle per take with identical lens, distance, background, pose, and lighting.
Review test: Place all views side by side at equal scale and trace the brow, nose, jaw, hairline, shoulder width, and distinguishing marks.
Production check: Keep the character neutral during approval: no dramatic expression, foreshortened pose, or moving camera. Those variables can hide structural drift. Add performance only after the front, three-quarter, profile, and rear views agree.
Keep each approved angle as a reusable reference asset. Later action shots can then inherit the closest matching view instead of asking the model to infer unseen anatomy from a single front image.
Model fit
Best AI models for this prompt
Veo
Use natural-language cinematography to direct identity anchors across front, three-quarter, profile, and rear views. Veo works best when physical cause, scene response, and camera intent form one coherent description; treat numeric settings as visual cues rather than guaranteed literal controls.
Kling
Use Subject Binding or the Element Library for recurring subjects, then direct identity anchors across front, three-quarter, profile, and rear views. Place the bound identity before style and action. Kling can produce expressive motion, so reduce simultaneous changes when consistency weakens.
Runway
Use Gen-4 References to lock the approved subject or composition, then prompt primarily for identity anchors across front, three-quarter, profile, and rear views. Generate difficult actions as separate short clips and assemble them in an editor when exact timing or continuity matters.
When to use
- Before producing a sequence, to build reference material.
- When creating a recurring brand character.
- To provide seed frames for image-to-video workflows.
When not to use
- For finished narrative shots.
- When the character only appears from one angle.
- For crowd or background figures.
Get more from it
Pro tips
- 1
Change only the angle, never the lens or the light.
- 2
Note the hidden anchor at each angle so you know your check has moved.
- 3
Use a mid-grey seamless background for clean reference frames.
- 4
Keep the best frames as image-to-video seeds.
- 5
Review one controlled take for identity anchors across front, three-quarter, profile, and rear views before increasing complexity.
Don't ship this
Common mistakes
✗ Changing lighting between angles.
Fix — Fix one lighting setup for the whole turnaround.
✗ Different focal lengths across views.
Fix — Use the same lens and camera distance for every angle.
✗ Expressive poses in a reference set.
Fix — Use a neutral pose and expression so the frames stay usable as seeds.
✗ Changing lens, pose, or light with the angle makes drift impossible to diagnose.
Fix — Generate one neutral angle per take with identical lens, distance, background, pose, and lighting.
People also ask
Frequently asked questions
Q.What do I use a turnaround for?
To validate your character lock before a shoot, and to produce seed frames for image-to-video generation.
Q.Why hold the lens constant?
Focal length changes facial proportions. If it varies, you cannot tell drift from lens distortion.
Q.How many angles do I need?
Front, both three-quarters and one profile cover most needs. Add the rear view if the character is seen walking away.